

The checkout page is the conversion point of any web shop. It aims to acquire information and convert a visitor into a customer that’s why it has to be modified and optimized accordingly. The design, content, and fields of a checkout page play a vital role in making the users swiftly finish their purchases. This post discusses the importance of customizing the fields for better user experience.
What is a custom checkout field?
By default, a checkout page has a selected number of fields to acquire basic information from customers. For a small business, it may be enough to continue doing business with the standard fields on the checkout pages. You may find it a limitation when you aim to acquire more information from prospective customers to know about them and their custom requirements. Adding options to cater to such a need are called custom checkout fields.
When do you need custom checkout fields?
As soon as your business grows, you may want to know about your customers and their varying product demands or suggestions for personalization. A conventional checkout page limits any possible communication between the store admin and the customers. If the customers have anything more to convey to your store, they may fail to do so.
For broadening the scope and purpose of your checkout pages, you may need to add custom checkout fields to allow them to address their problems more openly. For example, you can add a simple message option to allow customers to submit design and style customization, or a personal note printed or embossed to the product.
Knowing your client is among the key rules of doing any business. With a simple checkout page, you may not be able to know the hobbies, profession, interests, past time activities, likeness, lifestyle, feedback, and many opinions from your customers. You may need them when you aim to add another product line to your store. There, the common user interest matters the most.
How to add custom checkout fields in Magento 2?
A checkout page has a specific pattern that is common in most of the eCommerce platforms. Magento also follows the same pattern. It has the three to four steps that start with getting personal details and move further with billing, shilling, and payment details.
You can add custom fields to any of its step or phase to personalize it to your business-specific needs. Doing so with the help of custom code may be difficult, time-consuming, expensive, and risky as it may affect the overall code of your eCommerce website.
A simple and easy alternative is the installation of a tool that has the sole purpose of creating additional fields or replacing the difficult ones with user-friendly options.The Magento 2 Custom Checkout Fields extension is one of the recommended tools for modifying the multiple steps of a checkout page with personalized fields.
Let me brief you how you can create custom fields with a step-by-step tutorial as follows.
Step 1: Download and Install Magento 2 Custom Checkout Fields extension. Enable the tool and it will display as a separate tab in the admin dashboard of your Magento website.
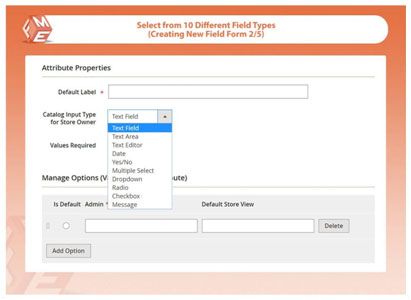
Step 2:Navigate to the ‘Manage Fields’ menu and click ‘Add New Attribute.’ This will take you to a complete configuration of creating a custom field.
Step 3: Name the additional field and select an input type. The extension has more than 10 field types to select according to the data you aim to acquire from the users. It includes:
- Area Field
- Area Text
- Text Editor
- Message
- Date
- Yes/No option
- Drop-down
- Multiple select
- Checkbox
- Radio button
- Image
- File
Step 4: Mark the field mandatory or voluntary to answer. It helps in acquiring the information compulsory to know.
Step 5: Use input validation to ensure the customers provide accurate data. Display the custom fields in email and PDF documents. Restrict them to specific store views and customer groups.
Step 7: Now, move to ‘Storefront Properties’ tab, and choose a specific checkout step where you want the custom field to add. For example, you can assign the personalized field to:
- Billing Address
- Shipping Address
- Shipping Method
- Payment / Review Step
Set a position and provide a tooltip as well.
Step 8: Save the attribute and a new custom field adds to the checkout page of your Magento-powered eCommerce website.
Conclusion Creating additional checkout fields is one of the effective strategies of knowing your clients while are placing orders on your eCommerce website. based on the additional information, you can draft powerful marketing strategies and make available the products your existing customers will be most interested in. the tool is quite useful in creating custom checkout fields with a variety of data input types. Make use of it and let us know how it benefits your online venture.