
Sitemaps are an essential part of every website and serve a key ranking factor for online stores. The relation of sitemaps with your website is quite similar to what a roadmap is to your travel destination.
Just like the roadmap, a Google-optimized sitemap allows the searcher to accurately reach the intended web destination, by improving the crawlability of the webpages and enabling search engines to easily index them. Sitemaps are particularly helpful for websites that are big and have lots of media content. Once you have integrated them to your Magento 2 store, sitemaps will communicate with search engine bots and inform any changes or updates made within the content of the website. This not only organizes your content but also improves the visibility and navigation of your web pages.
However, adding them to your Magento 2 store is different for every platform and demands adherence of proper instructions to make them functional. In this article, we will share a step by step guide to manually generate Google optimized Sitemaps for your Magento 2 store, and using Magento 2 Sitemap extension as bonus alternative for fast and easy integration.
XML Sitemap Are Particularly Important When
- Your web pages are created dynamically such as in some e-commerce sites
- Your website lacks proper structuring or falls behind in inter-linking
- Your website is newly developed or has few external links
- Your website includes lots of media and archived content
Gives Your Pages a Better Chance at Being Indexed
When Google Search Console received XML sitemap submitted by you, it gets a clue that the website has XML sitemap and could be of good quality and worthy of indexation. But more or less, it’s just a clue and in no way directly affects indexation.
Helps You Identify Which Pages Aren’t Being Indexed
While XML sitemaps do not help pinpointing the pages that aren’t being indexed, they do indirectly help in identifying them. When you submit your XML site map with 50,000 pages in it, Google may only able to confirm 35,000 which are being indexed. This gives you the confirmation that pages which have poor content, improper structure or other factors exist in your website which you can later map through tools and testing.
Allows You to Manage Page Link Juice
You can easily add “noindex,nofollow,” tags on XML site map and prevent utility pages that useful to users, but do not carry weight for search engine rankings. For pages that your leads and conversions depend upon, you must include in your site map. This helps you manage page preference instead of getting unnecessary pages ranked.
Consistency in Search Experience
Google engineers have worked on this aspect to improve the average consistency of website experience. Since every site has a number of “utility” pages which while being useful do not have content functions pages and are not worthy of becoming landing pages from search. XML sitemaps keep a visitor from getting bad experience after landing on a web page that is hugely downgraded from other pages of the website.
Configuring XML Sitemap for Magento 2 Store?
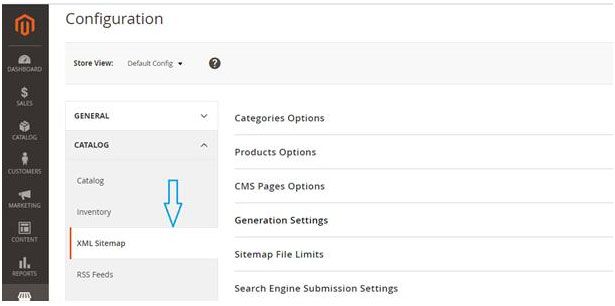
To get started, you must first configure an XML sitemap by logging into your Magento 2 Store’s admin panel and navigating toStores -> Configuration.
From here, select Catalog and click on XML Sitemap.
To make sure your sitemap is Google SEO optimized and adheres all the guidelines and standards set by Google, you must configure every option properly so the integration process does not make any conflicts. Here is an overview on how to configure these options individually.
Managing Frequency and Priority for Web Pages
Once you have generated a sitemap and added content, it becomes ready to be indexed by Google. This configuration allows you to manage and set priority for the different types of content that you have in your Magento 2 store.
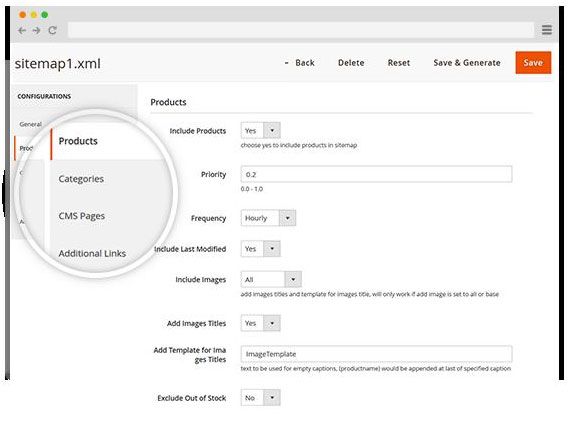
Options for Product, Categories, and CMS Pages
Once you have reached categories options, seek the Use Systems Value checkbox and Uncheck it to enable customization options for the store. At the Frequency dropdown bar, change frequency according to the number of times you update your catalog. For instance, if you are updating products on a daily basis then the frequency should be set to daily. Right below the Frequency option, you will see Priority option. Click on it to select the select a value between 0.0 and 1.0 to set the priority. Zero holds the highest priority. In this section you can also decide the extent to which product images will be added by selecting Add Images to Sitemap option and setting it to Base Only, None, or All.
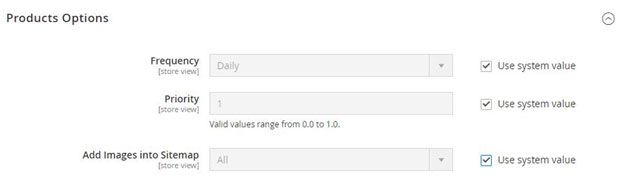
At the CMS Pages Options, follow the same process by adding values for Frequency and Priority.
Generation Settings
Now you are at the Sitemap Generation settings. Start by expanding the generation settings and changing the options as shown below.
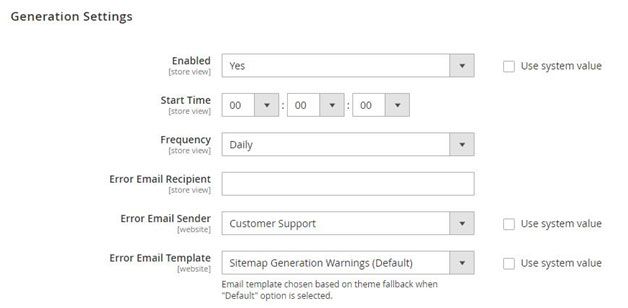
- Select Enabled and set it to Yes
- Select Start Time and add values for hour, minute and second. This will be time you configure for the updating the sitemap
- Select Frequency option and set it according to your preferences. You can set it as Daily, Weekly or Monthly
- At the Error Email Receipt field, fill in the email ID of the person you want to receive notifications when any error occurs while the sitemap is being updated.
- Select Error Email Sender as the person who will appear as sender of the notification
- Configure Error Email Template and select the template you want for the error email notification
Configuring Sitemap File Limits
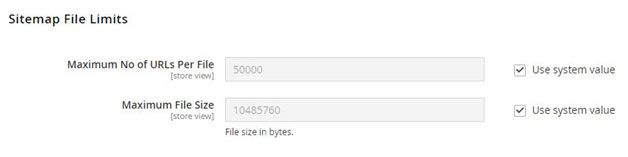
When you have arrived at the Sitemap File Limits,
Enter the max number of URLs that you want added in the sitemap at the Maximum No of URLs per File field. The Default limit set by Magento is 50,000.
Enter the largest size you want to allocate for the sitemap in the Maximum File Size field. The size set by default is 10,485,760 bytes.
Submission Settings for Search Engines
Lastly, set Enable Submission to Robots.txt to Yes, if robots.txt file is being used to instruct search engines to crawl and index your site.
Once you have finished this settings, click save configuration and your sitemap will be generated, integrated and functional.
Using Magento Extension for Sitemap Generation
While the steps we have shared are quite straight forward, many beginners and newly established Magento 2 store owners often feel reluctant in making changes to their stores by themselves. Besides, the default Magento 2 sitemaps comes with certain limitations such as not allowing to generate an HTML sitemap and creating multiple XML sitemaps.
Fortunately, there are extensions available such as XML & HTML Sitemap Extension for Magento 2 which helps merchants auto generate SEO optimized XML and HTML sitemaps for their stores.
You can also change HTML sitemap settings by adding Meta tags, enabling search field and arranging your content. This allows you to boost the visibility of your pages, improve user-experience, boost internal linking and setup Cronjob to automatically add new products to sitemap.
2 replies on “How to Generate Google Optimized Sitemaps Using Extension?”
Hey, I read your blog and your information about generating google optimized sitemaps using the extension is very amazing and helpful for me. Thank you so much:)
I really didn’t know some of these things before which you have shared with us through your helpful and informative article. also, I like your writing skills. keep sharing awesome stuff.