

Before you get onto creating your brand new blogging website, you should clarify a few steps that can make a big difference in the long run when it comes to making your blog a true success like some of the top bloggers out there earning big.
You can use various content management systems such as Wix, Joomla or Squarespace, but the most widely used one is WordPress and it’s also free.
For the best start in the blogging world a WordPress blog gives you full ownership and you won’t rely on regular subscription payments to keep it up and running, apart from the web hosting cost and domain cost which can be paid annually.
It is also advisable to choose a web hosting control panel that is easy and quick to use to manage a website.
So, consider the steps explained here to set up and manage your website with the SeekaPanel for the best performance.
Step 1: Domain Registration and Hosting in the Control Panel
Before you can buy a domain, you need to find and register a domain name for your blog, and you can find some guidance on the SeekaHost Blog.
- You can head over to https://www.seekahost.app/, where you can register your account first. Once you are logged in, you can go to the domain registration bar in the dashboard.
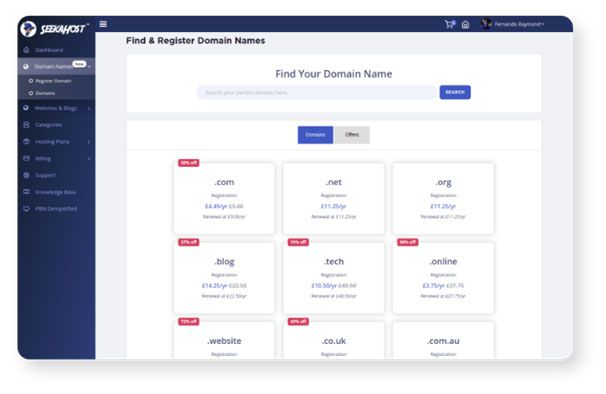
- Simply enter the preferred domain name you have chosen and select an extension (.com, .co.uk, .org) for it in the search bar.
- Then click on search to check for its availability.
- If available, you need topay a fee for the domain registration for a year so that you own the domain.
- Once you have made that payment, you will receive a confirmation email and you will have the domain ready in your SeekaHost client area.
Once your domain is purchased, you need to publish the website and its content on the Internet, which requires web hosting. The web hosting server acts as a platform between the client’s browser and your website.
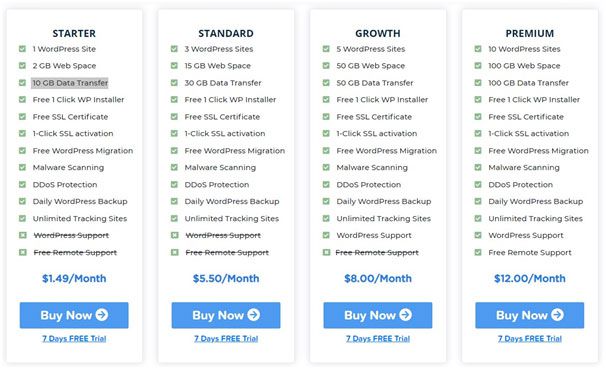
Inside the SeekaHost App you will find WordPress Hosting or PBN Hosting plans and you can choose your preferred hosting plan there.
Watch the below video in full and follow the simple steps to sign up, add your domain, get web hosting, and get your WordPress Blog live in 60 seconds:
Step 2: Set Up of your WordPress Blog & Customizing it

If you have followed all the steps in the previous video, then your WordPress blog should be up and running now.
WordPress offers about 8,045 WordPress themes and a huge number of plugins that will help you customize your website. You’re never going to overcome the FOMO of selecting one without checking the 8,000+ you skipped.
So how does one select a theme that will do justice to their site and its individuality?
The answer is – it is possible to select just the perfect theme for your WordPress site.
SeekaHosters have put together the most recommended WP themes in an extensive 100 to free WP theme guide on the seekahost.com blog, so you can make an informed choice of your dream theme that will make your blog look and feel exactly as you envision it.
You can also buy a customized theme if you don’t want to do all the customization yourself, just make sure to check the reviews. Once you have chosen your theme, it’s easy to install on your WP site so just follow the steps in the tutorial to follow further on.
For maximum functionality, it is recommended that you use plugins.
Plugins are extension modules for content management systems.Simply put, plugins will help you add additional features to your website.
Some examples:
Contact forms
Galleries
Sliders
Subscription forms
There are more than 50,000 plugins in WordPress alone. So, there’s a plugin for whatever you might want to add to your website.Plugins will help increase the functionality of your website. Not only that – they will also make it more appealing to search engines.
Plugins affect all the below-mentioned aspects of your blog:
Search engine optimization
Web analysis
Online marketing
More traffic, more money from advertisements, and more exposure for your blog – you can trust SEO plugins to handle all that.
With WordPress you can customize your blog’s header section, your general settings of your blog, your logo and anything else to do with the appearance. You should also customize your author profile and your blog menu and choose widgets.
Your widgets are basically blog sections that can be added to the side bar or footer of your blog and they provide additional information such as a calendar, weather forecast, a gallery etc. You may want to share your Instagram Feed in your side bar and your YouTube channel in your footer.
Watch this tutorial for more information on how to get the WordPress settings right from the get-go:
Lesson 4: Understanding Your WordPress Settings – YouTube
Step 3: Starting with Blogging and Publishing
First publish relevant blog pages such as an about page or a contact page to start with. To create a new page, go to the WordPress Dashboard option, from the left panel select the Page option and click on Add New. A text editor will be displayed where you can start framing your content by adding a title, body text, media, forms etc.
After you have completed writing the contents, review them once again and then publish it. We also recommend creating the text first in a Word or Google Document and to save it to ensure the content won’t get lost.
Remember once you click publish, your contents will be displayed on the site and any user accessing your site can view it, so craft it carefully.
The technical part of composing a blog is quite simple and you can find WordPress tutorials at seekahost.app, but if you want to compose a page and post that ranks well on search engines, there are other elements you need to consider while publishing in WordPress.

We recommend you learn more about SEO through SEO Training Courses at the SeekaHost University inside the seekahost.app where you will find many in-depth tutorials to fully grasp all vital SEO techniques to make your blog rise to the top.
You should also utilize SEO plugins like the All-in-One SEO plugin, which suggests optimization recommendations for your content to rank better.
Step 4: Make your Website a Success
Now, it is time to set up your tracking site. All the WordPress blogs you set up inside the SeekaPanel can exclusively be tracked inside the app.
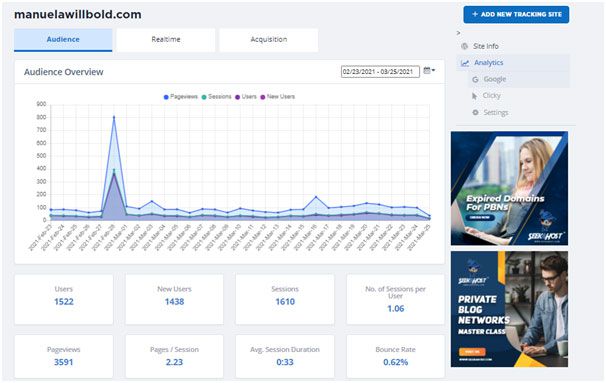
This will save you a lot of time as in one click you have all the tracking data via Google Analytics and Clicky available in your dashboard for each blog. Watch the explainer video below to get an idea of how this innovative solution works and don’t worry, if you’re not that technical, it’s all explained in simple steps inside the knowledge base in the SeekaHost app.
How to connect Google and Clicky Analytics to SeekaPanel. – YouTube
Before you can connect your website with the SeekaHost App tracking features, you need to integrate the Google Search Console with your website to access the functionalities of the search console, meaning you create a link between your website and the Google Search console.
Once you install the Google Analytics tool which is available free of cost, you’re ready to track the performance of your websites.
To connect your website with clicky.com, you will be required to sign up with Clicky first to receive a tracking code. Once you have done so, you can head to your dashboard inside the SeekaHost App and link your blog with your Clicky account to keep track of every traffic coming in.
SEO and tracking go hand in hand, which is why SeekaHost offers this unique feature in the SeekaHost App. Ensure that you can analyse your blog’s performance effortlessly so that you can really monetize it. Using analytics tools is vital for blog monetization and marketing of any kind. So, with the SeekaHost App you’re already ahead of the game from the start as a blogger beginner.
One reply on “5 Steps for Blogging Beginners to set up a successful Blog”
Thank you for sharing these steps in Blogging. I myself am a beginner. This blog helps!